Cone Crusher V-belt Initial Installation, Tensioning, and Precautions
What is the cone crusher V-belt?
A cone crusher V-belt refers to the V-shaped belt that transmits power from the motor to the cone crusher’s main shaft. The V-belt is an important component in the cone crusher because it ensures that the crushing process runs smoothly and efficiently.
The cone crusher V-belt is typically made of rubber or synthetic materials and is designed to handle the high torque and heavy loads that are required to crush rocks and minerals. The V-belt is designed to be flexible and durable, so it can withstand the constant movement and vibration of the cone crusher without breaking or stretching.
Regular maintenance of the cone crusher V-belt is important to ensure that it remains in good working condition. This includes checking the tension of the V-belt, replacing the V-belt if it becomes worn or damaged, and ensuring that the V-belt is properly aligned with the pulleys on the motor and main shaft.
Initial Installation of Cone Crusher V-belt Drive
For the initial installation or when reassembling the V-belt drive, proceed as follows:
- Clean all oil, grease or rust from the sheave grooves.
- Make certain that the sheaves are correctly aligned and that the shafts are parallel.
- Never force belts onto sheaves. Always shorten the center distance until belts can be slipped on easily. To determine the minimum allowances for shortening or lengthening the center distance between sheaves, see the following Table. After calculating a center distance from a standard pitch length make provision that the centers can be moved closer together by the amount shown in the following table to facilitate installing the belts without injury. Also, the centers should be adjustable over the calculated distance by an amount as shown in the last column of the table because of manufacturing tolerance and possible stretch and wear of the belt.
- Always use a matched set of belts and use new belts of the same manufacturer. Never mix worn and new belts.
- Place belts on sheaves and run the drive for a few minutes. Then tension the drive until only a slight bow or sag appears on the slack side of the belts when the drive is running.
| Minimum Allowance mm (Inches) Below Center Distance For Installation of Belts |
||||
| Belt Length* mm (Inches) | V-Belt Section | Minimum Allowance Above Center Distance For Stretch and Wear |
||
| 8V | 8V Banded Belts | SPC | ||
| 2000 (79) thru 2749 (108) | 40 (1 1/2) | 85 (3 3/8) | 35 (1 3/8) | 40 (1 1/2) |
| 2750 (108) thru 3499 (138) | 40 (1 1/2) | 85 (3 3/8) | 35 (1 3/8) | 45 (1 3/4) |
| 3500 (138) thru 4499 (177) | 40 (1 1/2) | 85 (3 3/8) | 35 (1 3/8) | 55 (2 1/8) |
| 4500 (177) thru 5499 (216) | 45 (1 3/4) | 90 (3 1/2) | 35 (1 3/8) | 65 (2 1/2) |
| 5500 (216) thru 6499 (256) | 45 (1 3/4) | 90 (3 1/2) | 40 (1 1/2) | 85 (3 3/8) |
| 6500 (256) thru 7999 (315) | 45 (1 3/4) | 90 (3 1/2) | 40 (1 1/2) | 95 (3 1/2) |
| 8000 (315) thru 9999 (394) | 50 | 100 | 45 (1 3/4) | 110 (4 3/8) |
| over 10,000 (394) | 50 | 100 | 45 (1 3/4) | 140 (5 1/2) |
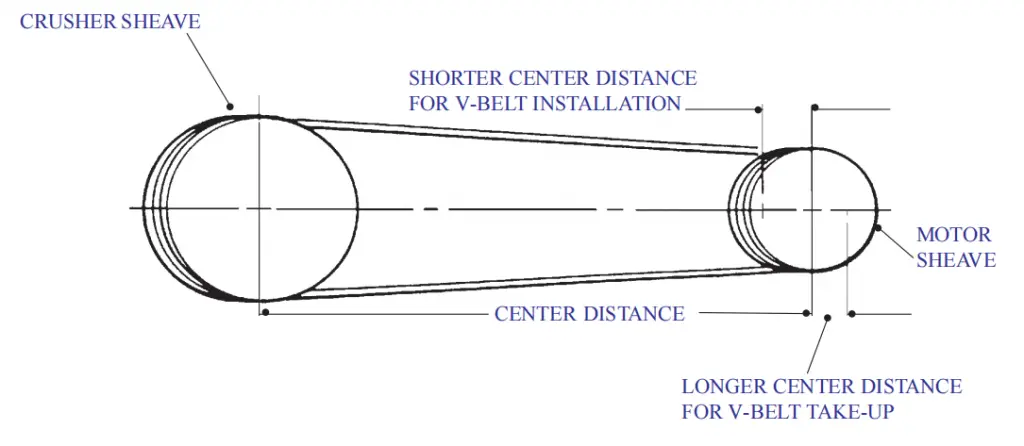
Tensioning The Cone Crusher T-belt Drive
Tensioning the drive is a term used when force is applied to the V-belt by some method to provide the wedging action between the V-belt and the sheave. This wedging action provides the ability for a V-belt to transmit power from the motor sheave to the crusher sheave.
Various methods of tensioning V-belts have been established. Two simplified methods will be described in the following paragraphs; Tension-Deflection and Percent (%) of Elongation. Either of these two methods will provide satisfactory belt tension. Each has certain advantages for a given type of belt.
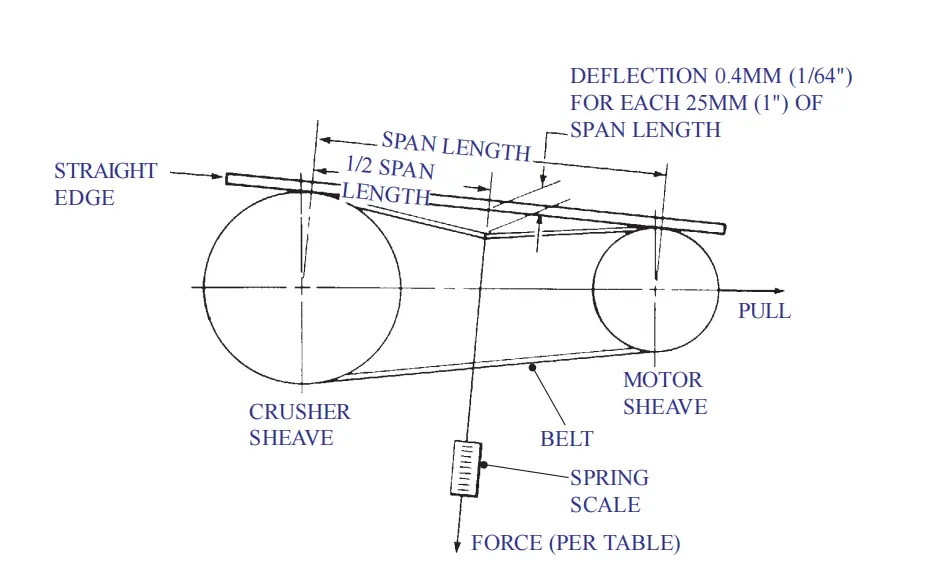
For tensioning the drive using the TENSION-DEFLECTION method, proceed as follows:
- Place a straight edge across the top of both sheaves. See the following picture.
- Measure the span length.
- Using a spring scale at right angles to the center of the span length, apply a force to the scale great enough to deflect one of the belts the equivalent of 0.016 times millimeters of span length (0.016 times inches of span length).
- The force should approximate the forces shown in the following table for a properly tensioned drive.
- At the end of 2-4 hours of operation, the drive should be re-tensioned to approximately the maximum force.
- After 24-48 hours, it is well to check the drive to see if the force on the belts is between the minimum and maximum force as shown in the following table. Retention if necessary. Either excessively low or high tension will affect the life and operation of a V-belt
| Belt Section |
STANDARD BELT | BANDED BELT | ||
| Minimum Tension Kgs (in Lbs.) |
Maximum Tension Kgs (in Lbs.) |
Minimum Tension Kgs (in Lbs.) |
Maximum Tension Kgs (in Lbs.) |
|
| 8V | 15.4 (34) | 22.7 (50) | 18.1 (40) | 27.2 (60) |
| SPC | 10.4 (23) | 15.4 (34) | 11.8 (26) | 18.1 (40) |
WHEN PROPERLY TENSIONED A NARROW V-BELT MAY NOT FEEL AS TIGHT AS ONE MIGHT EXPECT FROM THE TENSION THEY CARRY. THEREFORE, IT IS ADVISABLE TO USE ASPRING SCALE TO CHECK BELT TENSION ON THESE BELTS.
For tensioning the drive using the PERCENT (%) OF ELONGATION method, proceed as follows. This particular method of tensioning V-belt drives was developed primarily for tensioning banded belts.
- Remove the slack from the belts.
- Next,wrap a 15 meter (50 foot) steel tape around the outside circumference of the belt and measure to the nearest millimeter (1/16″). Record this length.
- Multiply this recorded length by a percent of elongation factor which is shown in Table 2-5 and add this amount to the initial measurement.
- Elongate the belt to this new reading. Therefore, on an installation with an 8V belt and an outside circumference measurement of 3 meter, 48 mm (120″), the motor sheave should be moved away from the crusher sheave until the steel tape reads 3 meter, 75 mm (121-1/16″) for a properly tensioned drive.
- Periodic belt tension checks must be made and if re-tensioning becomes necessary, the tensioning process lust described should be repeated.
It must be pointed out that the TENSION-DEFLECTION METHOD is the preferred method of tensioning V-belts.
Usually, the first sign that indicates re-tensioning is necessary is belt slippage. This slippage will show up in loss of power and speed at the crusher sheave and in a high rate of belt and sheave groove wear. These conditions are usually accompanied by belt «squeal» and also heating up of belts and sheaves. These conditions are readily apparent and can be detected by simply looking, listening, and feeling.
Cone Crusher V-Belt Precautions
Some of the do’s and don’ts in connection with proper V-belt drive operation are as follows:
- DO – Check belt tension frequently during the first few days of run-in operation. When the belts have had time to become seated in the sheave groove, retention the belts. New belts have a certain amount of initial stretch and will require additional tensioning.
- DON’T-Overtighten belts as too much tension shorten both belt and bearing life. Maintain uniform tension. Idle belts should appear snug or tight; in motion, they have a slight sag on the slack side.
- DO – Keep drives well-ventilated as heat buildup over 60°C (140°F) causes belt life to become shortened. The sides of the belt guard must be designed to allow for adequate circulation of air. Either perforated plate or expanded metal is ideal for this type of application.
- DON’T – Allow any oil or grease to come in contact with the belts as excessive oil causes the rubber to swell and the belts to fail prematurely.
- DO – Make V-belt drive general inspections on a periodic basis. The following points should be checked at each inspection: Loss of crusher speed – check tension; Unequal stretch – check for internal breaks; Excessive elongation – check for overload; Belt softening or swelling check for oil or grease; Belt hardening and cracking – check for excessive heat.
