VSI Crusher Rotor Balancing
It is important that the rotor is properly balanced in order to provide the maximum trouble-free life of the shaft line assembly in the crusher. Most brands of VSI crushers manufactured rotor balance machines are designed specifically, and only, for this job.
To get the best results from the balance machine, it must be properly set up and in good mechanical order.
ASSEMBLY – SMALL ROTOR BALANCE MACHINES (300mm and 500mm rotors only)
The bearing assembly of these machines is supplied fully assembled. All that remains is to:
- Assemble the RHS support to the base with the bolts provided.
- Assemble the bearing assembly to the RHS support with the nut provided.
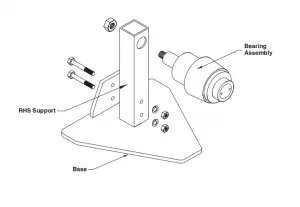
ASSEMBLY – LARGE ROTOR BALANCE MACHINES (690mm, 760mm, 840mm, and 990mm rotors only)
These machines require full assembly as follows:
- Assemble the two side plates of the frame with the joining plates, threaded rod, and nuts supplied.
- For 840mm and 990mm rotors only, fit the adapter sleeve to the balance shaft.
- Clean the bearings in solvent to remove all traces of dirt, grease, oil, etc. Fit the bearings to the balance shaft and tighten the grub screws.
- Rest the shaft assembly on the frame. The shaft should rotate freely.
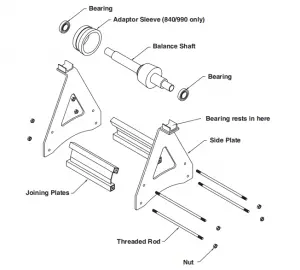
WHEN TO BALANCE
- The rotor must be balanced after any repair work has been carried out, e.g. hard-facing.
- In the case of 300mm rotors, the rotor must be balanced after turning or changing the upper or lower wear plates.
- It is advisable to check the balance if the vibration switch trips out repeatedly and the wear plates appear to be in good condition.
OPERATION
In all cases, remove rock build-up, dirt, old wear parts, etc. before attempting to re-balance the rotor.
- For 300mm rotors, re-fit clean wear parts in the new position ready for the next period of operation.
- Make sure the taper in the rotor and on the rotor balancer are clean and free from damage.
SMALL ROTOR BALANCE MACHINES
- Lay the rotor balance machine on its back and lower the rotor onto the taper.
- In the case of 500mm rotors, assemble the adapter washer onto the balancer housing.
- Lock the rotor on with the locknut.
- Tilt the rotor upright.
- Make sure the balancer is level.
LARGE ROTOR BALANCE MACHINES
- Ensure the balance frame is level.
- Remove the bearing from the end of the shaft that passes through the rotor.
- Insert the balance shaft through the rotor.
- Locate the rotor on the taper, ensure that the two tapers fit evenly, fit the rotor balance washer and rotor balance locknut, and tighten with a hammer.
- Fit bearing back onto shaft and tighten the grub screw.
- Using suitable lifting apparatus, position the rotor and balance shaft on the support frame.
BALANCING PROCEDURE
- Thoroughly clean out the rotor of all rock, dirt, old wear parts, and any old welded weights from a previous balance. Check for perforations in the inner and outer walls.
- Check taper in rotor boss is clean and free from damage.
- Remove weights from the previous balance and set rotor up level in the rotor balancing frame.
- Gently rotate the rotor and allow it to wind down to a stop. The heaviest point on the rotor is now at the bottom.
- With chalk mark the blades A, B, and C.
- Add weights to blade A until blade B is at the top dead center. Each time weight is added give the rotor a gentle push in the direction you are working and allow the rotor to settle to the new balance point. This helps overcome bearing friction.
- When blade B has settled at Top Dead Centre, pull it around 90° and hold it steady there by hand.
- Add weights to the blade you are holding down (B) until it doesn’t try to go up or down.
- Sometimes blade B won’t take enough weight to balance the rotor. If this is the case cut a piece of 50mm x 12mm flat bar 200mm long and weld it onto the B section where indicated. Use a small tack weld so the weight is easy to remove for the next balance. Repeat the whole balancing exercise.
- When you think the rotor is balanced, rotate the rotor in 90° steps four times. If the rotor does not move from each stop, it is balanced.
- Tighten the balance bolts.
- Keep spare weights in a safe place.
TROUBLESHOOTING
If the rotor fails to balance properly, check the following:
- Make sure there is no loose material in the rotor that could be moving as the rotor is turned.
- Make sure the rotor balance machine is level and the bearings are totally clean.
- Make sure the tapers are in good condition.
- Make sure the bearings are not damaged or worn.
After all, checks have been made, attempt to balance the rotor.
MAINTENANCE
The rotor balance machine is designed to give many years of trouble-free operation. However, as with any precision machinery, proper care must be taken to ensure this is the case.
- Wrap a cloth around the taper on the balance machine when not in use.
- For the large balance machine, remove the bearings from the shaft and store in a container of light machine oil.
- Store all components in a clean environment.
Qiming Casting is a China VSI crusher wear parts manufacturer, we supply kinds of wear parts for all popular brands of VSI crushers. If you need rotor balancing of any VSI crusher parts, please contact us!
